FreeCAD is a powerful open-source parametric 3D modeling software that is ideal for creating designs specifically tailored for 3D printing applications. With its intuitive interface and robust set of tools, FreeCAD allows users to easily manipulate and iterate on their designs with precision and accuracy. Its parametric design approach enables easy modification of dimensions and shapes, making it ideal for creating complex geometries required in the 3D printing process.
Additionally, FreeCAD supports various file formats commonly used in 3D printing, such as STL and OBJ, ensuring seamless integration into the printing workflow. Moreover, FreeCAD’s active community of users provides valuable resources and support, making it an excellent choice for professionals looking to leverage 3D printing technology in their projects with efficiency and reliability.
FreeCAD is a powerful open-source CAD software that can be used to design models for 3D printing. This guide will walk you through the steps to prepare your FreeCAD designs for 3D printing, from creating your model to exporting it as an STL file.
Related posts:
- How AI in CAD Market Transforming Growth
- Creaform Releases Scan-to-CAD Pro for Advanced 3D Data Conversion
- JETCAM Introduces a Free Tool for Viewing CAD Files
1. Design Model for 3D Printing in FreeCAD-:

In FreeCAD, the design model for 3D printing is an essential component in the additive manufacturing process, allowing users to create intricate and precise models for production. This design model serves as a blueprint for the 3D printer, providing detailed instructions on how to construct the final product layer by layer. Through FreeCAD’s intuitive interface, professionals can easily manipulate shapes, dimensions, and materials to achieve their desired outcome.
Additionally, the software offers various tools and features such as parametric modeling, constraint-based sketching, and mesh design capabilities that enable users to optimize their designs for 3D printing. By utilizing FreeCAD’s design model for 3D printing, professionals can streamline their workflow, reduce errors, and produce high-quality prototypes or functional parts with accuracy and efficiency. Start by creating your 3D model in FreeCAD. Use the appropriate workbenches depending on your design:
- Part Design Workbench: For creating parametric models.
- Sketcher Workbench: For creating 2D sketches that can be extruded or revolved.
- Part Workbench: For creating basic geometric shapes and boolean operations.
Tips for 3D Printing:
- Ensure your model is manifold (watertight) with no gaps or holes.
- Avoid overhangs that require excessive support material.
- Design with wall thickness in mind (typically 1-2 mm for most printers).
Related posts:
- Open-Source CAD Software for Linux Operating System
- EXModel Streamlines the CAD Process from 3D Scanning to Manufacturing
- Basic Guide to Autodesk Inventor and How Does It Work?
2. Check Model Errors for 3D Printing-:
When preparing 3D models for printing, it is crucial to carefully check for errors that may affect the final outcome of the print. In FreeCAD, users can utilize various tools and features to identify and rectify potential issues in their models before sending them to a printer. One common type of error to watch out for is model geometry errors such as non-manifold edges, self-intersections, or inverted normals. These errors can result in failed prints or poor surface quality if not addressed promptly.
Additionally, verifying that the model’s dimensions are accurate and suitable for the intended printing process is essential to ensure a successful print job. By thoroughly examining and correcting any errors in the model beforehand, users can significantly reduce the risk of wasting time and materials on failed prints. Before exporting, check your model for issues that could affect printability.
a. Use the Part Workbench:
- Select your object.
- Go to
Part > Check Geometry. - Review the results for errors like non-manifold edges or self-intersections.

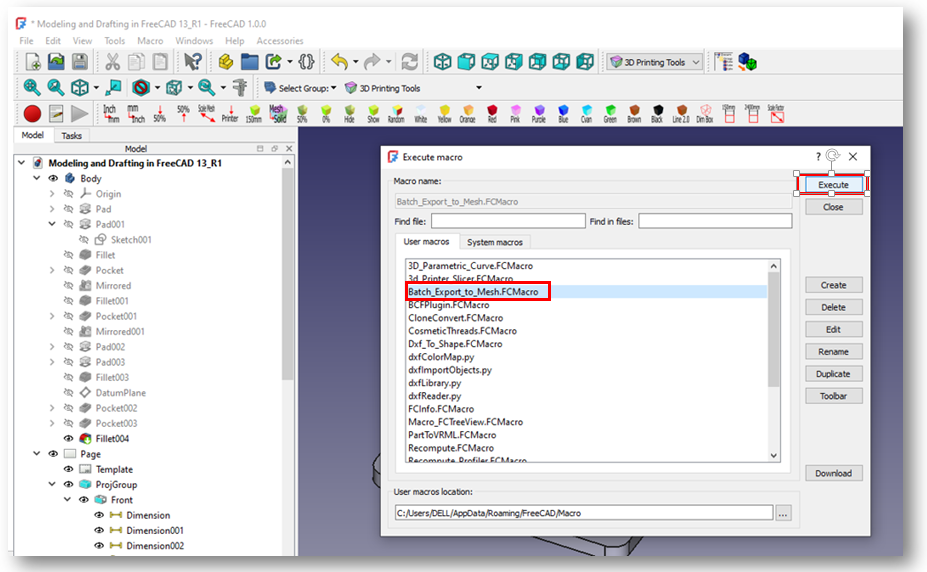
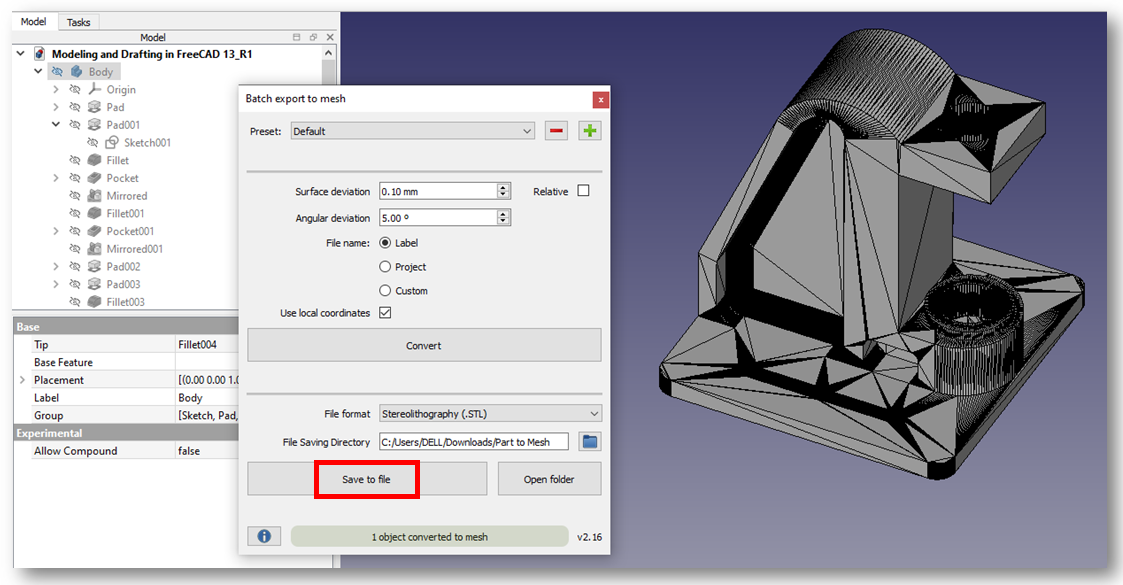
b. Use Batch Export To Mesh Macro:
This macro helps batch converting to mesh and exporting STL and OBJ files. It adds a GUI for speeding up the conversion and file saving of selected object.
Some best feature of this macro are as follow.
- FreeCAD standard meshing option
- Custom names (object, project or custom)
- Converts/exports one or several objects at once
- Convert objects into the active FreeCAD project or
- Export objects to STL or OBJ files
- Absolute or relative paths are allowed
- Select local or global coordinates (useful for 3D print design)
- Creates folders if needed
- Opens folder in file explorer
- Preset loading/saving
- Remember last preset used
Run the Macro as shown in below image.
Click on Convert option and and also define the path to save your STL file. As shown in below image.
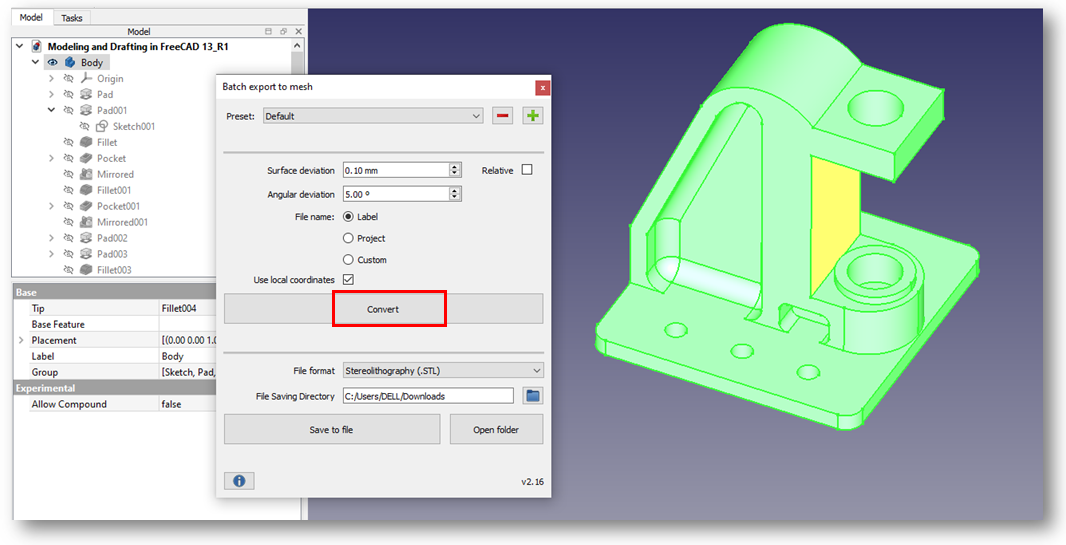
Our model is converted into mesh as shown in below image. click on save to file option STL version of model get saved.
Related posts:
- Beginner Guide to Computer Aided Design
- Open-Source CAD Software for Linux Operating System
- EXModel Streamlines the CAD Process from 3D Scanning to Manufacturing
3. Use the 3D Printing Tools Workbench-:
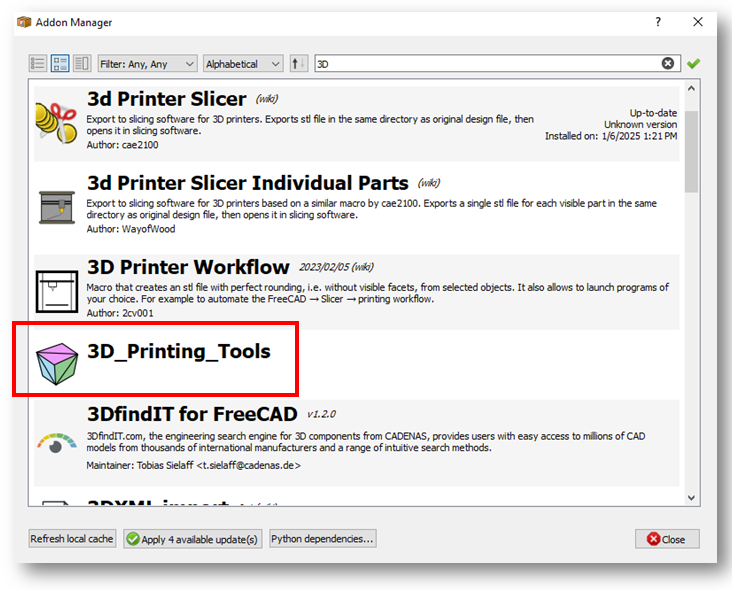
The 3D Printing Tools Workbench provides additional tools for preparing models for 3D printing. like scale the model, change the unit & convert mesh into solid. I open model converted into mesh into FreeCAD and you can see various option as shown in below image.

Use slicing software (e.g., Cura, PrusaSlicer) to generate G-code for your 3D printer. Import your STL file into the slicer and adjust settings like layer height, infill, and supports.
Related posts:
- Beginner Guide to Computer Aided Design
- Best Mechanical Design Software 2025
- How AI in CAD Market Transforming Growth
4. Optimize for Printing-:
Begin with the “Part” workbench. Use the “Check Geometry” tool to ensure your model is a valid, watertight solid (manifold) without errors. For printing, convert the solid to a mesh using the “Mesh Design” workbench. Create a mesh from your part and run “Analyze → Evaluate & Repair Mesh” to fix holes, non-manifold edges, and intersecting faces.
-
- Hollow Your Model: Use the
Part > Thicknesstool to hollow out your model and save material. Ensure all walls have a thickness greater than your printer’s nozzle diameter (typically > 0.8mm). Avoid paper-thin surfaces. - Add Supports: Use the slicing software to generate supports for overhangs. Design to minimize severe overhangs (above 45°). Use chamfers and fillets to improve support contact and model strength.
- Orient Your Model: Rotate your model in the slicer to minimize overhangs and improve print quality.
- Holes & Threads: For functional holes, model them slightly smaller and drill them post-printing for accuracy. Avoid modeling fine threads; use heat-set inserts instead.
- Export: Once optimized and repaired, export the mesh in a standard 3D printing format like STL or 3MF using “File → Export”. This cleaned and validated model is now ready for your slicer software.
- Hollow Your Model: Use the
Related posts:
- Best Meshing Practices for Accurate FEA Results
- Best Meshing Practices for Accurate FEA Results
- Introduction to Topology Optimization: Designing Lighter, Stronger Parts
5. Print and Test-:
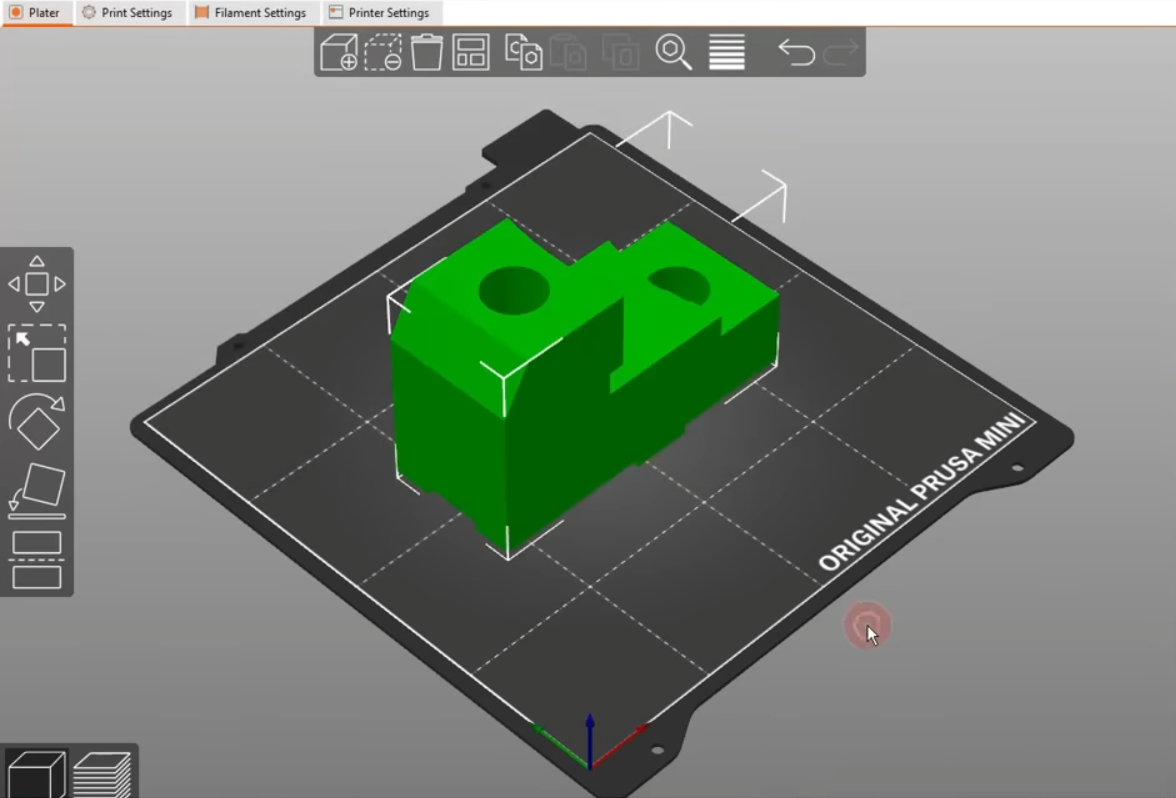
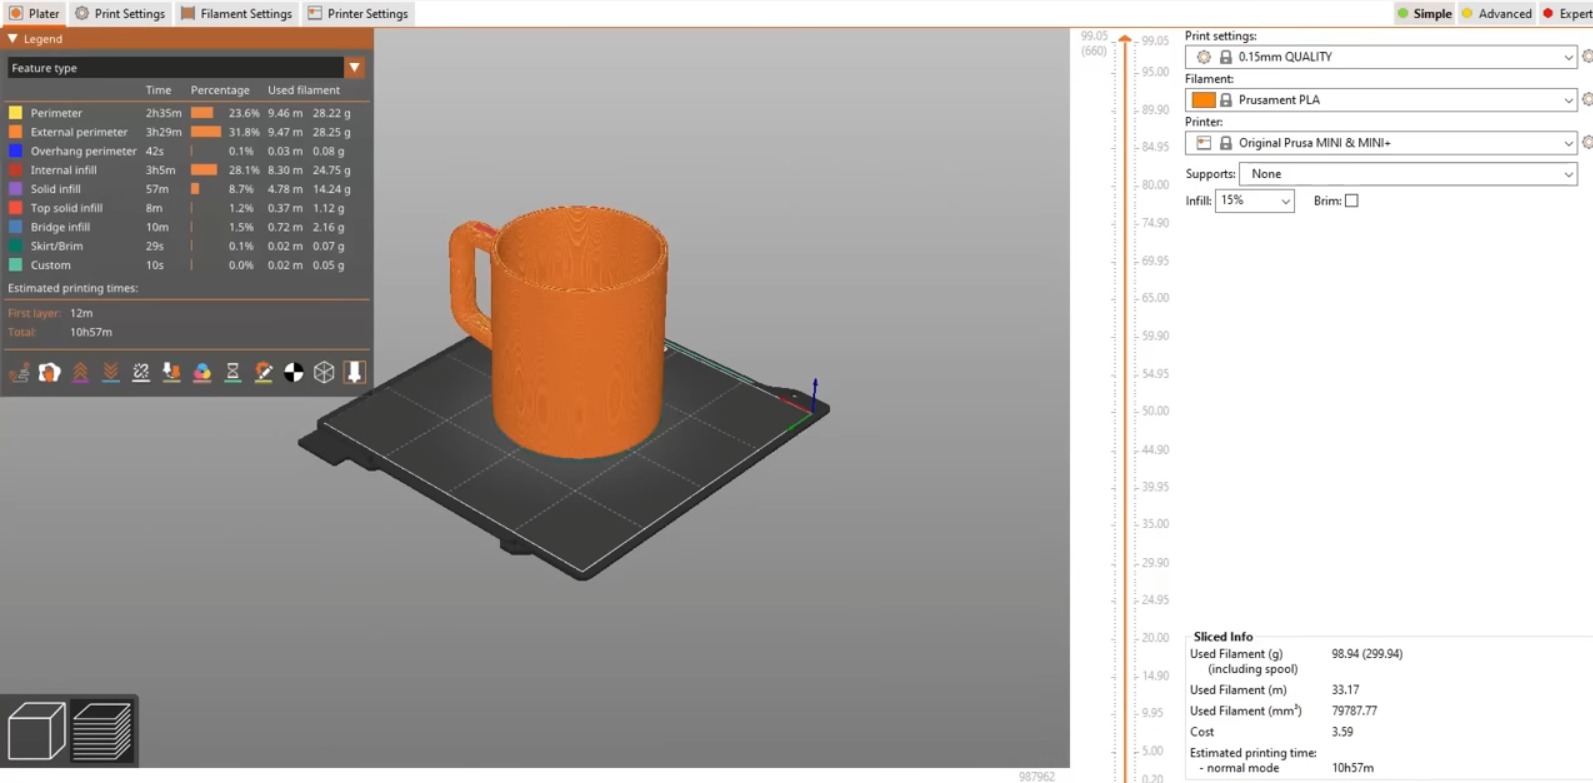
I Personally use PrusaSlicer is a powerful, open-source, and free “slicer” software for 3D printing. It translates 3D models (STL, 3MF) into instructions (G-code) that your printer understands. You load your 3D model and position it on the virtual print bed as shown in above image.
Apply slice setting like print profile (e.g., Quality vs. Speed), material profile (PLA, PETG), and a printer profile. you can also slice to preview the print layer-by-layer and then export the G-code file to an SD card or via a network connection.
Related posts:
- The Ultimate Guide to Vacuum Casting for Prototypes
- Introduction to GD&T in Manufacturing
- How to Perform a First Article Inspection (FAI)
6. Troubleshooting Common Issues-:

1. Poor Bed Adhesion (Print Detaches)-:
This is often the first hurdle. Ensure your print bed is perfectly level (trammed) to maintain a consistent first-layer squish. Clean the bed thoroughly with isopropyl alcohol to remove oils and dust. If problems persist, apply a suitable adhesive like a glue stick or hairspray on bare glass or smooth PEI sheets to improve grip. Furthermore, verify your first layer settings in the slicer; the initial layer height should be slightly smaller (e.g., 0.2mm), and the print speed should be slow (e.g., 20mm/s) for better deposition.
2. Layer Shifting-:
This is typically a mechanical issue. Check that all belts are tight and have no slack, as loose belts cause the printhead or bed to lose position. Ensure all pulleys are securely fastened to their motor shafts. Also, verify that the stepper motor currents are correctly set by your printer’s manufacturer; undervalued currents can cause skipped steps under load.
3. Under-Extrusion & Stringing-:
These are related to filament flow. Under-extrusion (gaps in layers) can be caused by a partially clogged nozzle. Perform a “cold pull” to clear it. Also, calibrate your extruder’s E-Steps to ensure it’s pushing the correct amount of filament.
Stringing (thin plastic hairs between parts) is due to oozing during non-print moves. The primary fix is to increase the retraction settings in your slicer. Enable retraction and adjust the retraction distance and speed. Additionally, ensure your printing temperature is not too high, as hotter filament oozes more easily.
4. Warping-:
This occurs when plastic cools and contracts, pulling corners off the bed. The best defense is a heated bed set to the correct temperature for your material (e.g., 60°C for PLA, 80°C for PETG). Using a brim in your slicer provides extra surface area to hold down corners. Drafts from an open window or air conditioner can also cause uneven cooling, so minimize airflow around the printer.
Related posts:
- A Guide to Common CNC Machining Tolerances
- Best 2D CAD Drafting software of 2025
- Work-Life Balance for Mechanical Engineers in India: Myth or Reality?
By following these steps, you can effectively prepare your FreeCAD designs for 3D printing, ensuring high-quality prints and minimizing errors. Happy printing!
“Thank you for reading! If you found this article insightful and valuable, consider sharing it with your friends and followers on social media. Your share can help others discover this content too. Let’s spread knowledge together. Your support is greatly appreciated!”