FreeCAD Addons are essential tools that significantly enhance the user experience by providing additional functionalities, features, and customization options to the FreeCAD software platform. These addons offer a wide range of capabilities such as advanced modeling techniques, simulation tools, rendering options, and compatibility with various file formats making it an indispensable asset for professionals in the engineering, architecture, and design fields.
By integrating these addons into their workflow, users can streamline their design process, increase productivity levels, and create more complex and sophisticated models with ease. With regular updates and contributions from a dedicated community of developers, FreeCAD Addons continuously evolve to meet the demands of users and provide innovative solutions for professional projects. Ultimately, these addons empower users to achieve higher levels of creativity, efficiency, and precision in their designs while maximizing the potential of FreeCAD software for professional use.
Related Posts-:
- Easily Rotate Sketch in FreeCAD
- FreeCAD vs. Fusion 360: Comparison to Determine the Best CAD Software
- Getting Started with FreeCAD: Your No-Cost Introduction to 3D Design
FreeCAD is highly extensible, and its functionality can be significantly enhanced with add-ons. These add-ons provide new tools, workbenches, and features to streamline your workflow and expand your capabilities. Here’s a guide to some of the most useful FreeCAD add-ons and how to install them:
How to Install Add-ons-:
To install FreeCAD add-ons, begin by opening the FreeCAD software and navigating to the “Tools” menu. Click on the “Addon Manager” option in the dropdown menu, which will display a list of available add-ons categorized by topic. Select the desired add-on from the list and click on the “Install” button next to it.
The software will then download and install the selected add-on automatically. Once installation is complete, restart FreeCAD for the changes to take effect. It is essential to note that some add-ons may require additional dependencies or configurations, so be sure to read any accompanying documentation before proceeding with installation. By following these steps, users can easily enhance the functionality of FreeCAD with a variety of useful tools and features to improve their design and modeling workflow.
- Open FreeCAD and go to Tools > Addon Manager.
- Browse or search for the add-on you want.
- Select the add-on and click Install.
- Restart FreeCAD to activate the new tools.
Related Posts-:
- Setup Auto Spacing in FreeCAD Sketcher
- Easily Slice Part with Plane in FreeCAD
- Insert Surface Finish Symbol in FreeCAD Drawing
Top FreeCAD Add-ons-:
1. Assembly Workbenches-:
The Assembly Workbench is FreeCAD’s new built-in assembly workbench. It uses the open-source Ondsel solver. FreeCAD’s native assembly tools are limited, but these add-ons fill the gap:
- A2plus: A lightweight assembly workbench for creating and managing assemblies.
- Assembly4: A more advanced workbench based on LCS (Local Coordinate Systems) and expressions.
- Assembly3: A powerful but experimental workbench for complex assemblies.
Use Case: Ideal for mechanical designers working with multi-part assemblies.
Related Posts-:
- FCViewer-: Easiest Way to Showcase FreeCAD Project
- Model Involute Gear in FreeCAD
- Let’s understand FreeCAD Part Workbench
2. FreeCAD Fasteners Workbench-:
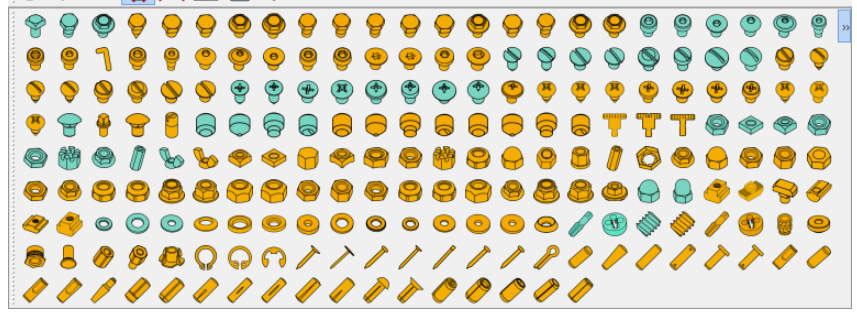
The FreeCAD Fasteners Workbench is a specialized tool within the FreeCAD software that allows users to easily insert, customize, and manage fasteners such as nuts, bolts, screws, washers, and more within their 3D models. This workbench streamlines the design process by providing a comprehensive library of standard fastener types and sizes for quick selection and insertion into assemblies.
Users can modify parameters such as length, diameter, thread pitch, material properties, and more to accurately represent real-world fastening components in their designs. Additionally, the FreeCAD Fasteners Workbench offers features like automatic alignment and collision detection to ensure precise placement of fasteners within assemblies. Overall, this powerful tool enhances productivity and accuracy in the design workflow by simplifying the incorporation of fastening elements in CAD models.
- Fasteners Workbench: Adds a library of standard fasteners (screws, nuts, bolts, washers) to your projects.
- BoltFC: Another fastener library with parametric bolts and nuts.
Use Case: Perfect for adding realistic fasteners to mechanical designs.
Related Posts-:
- How to Clone and Rotate Body in FreeCAD
- Free Online Tool to View CAD Files
- FreeCAD as An Open-Source Parametric 3D Modeling Software
3. FreeCAD Mesh Tools-:
FreeCAD Mesh Remodeling Workbench-:
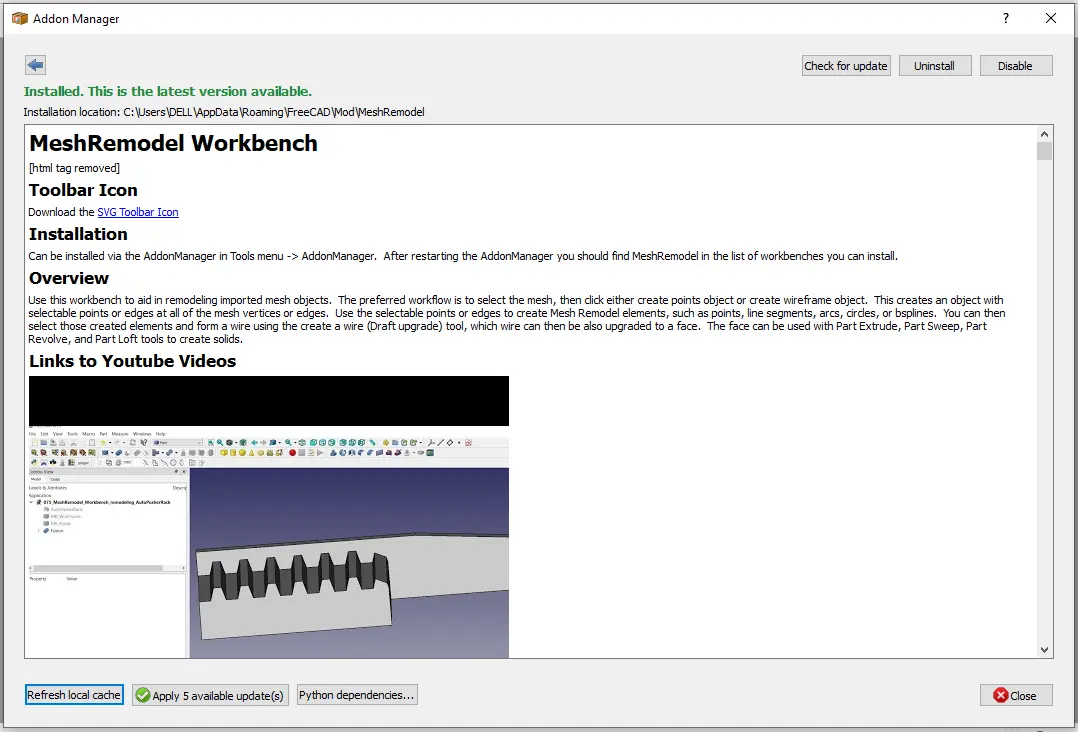
The MeshRemodel Workbench is a FreeCAD add-on designed to help convert imported mesh files (like STLs) into editable, parametric CAD models. It’s a powerful but specialized tool for reverse engineering or repairing mesh objects within FreeCAD.
🧰 Overview of the Mesh Remodel Workbench-:
| Feature | Description |
|---|---|
| Primary Purpose | Aids in remodeling imported mesh objects into parametric CAD models. |
| Key Capability | Creates selectable points and edges from mesh vertices for use in sketching. |
| End Goal | Generate Wires, Faces, and Solids usable with standard FreeCAD tools (Extrude, Revolve, etc.). |
| Typical Source | Scan data or mesh files from other software. |
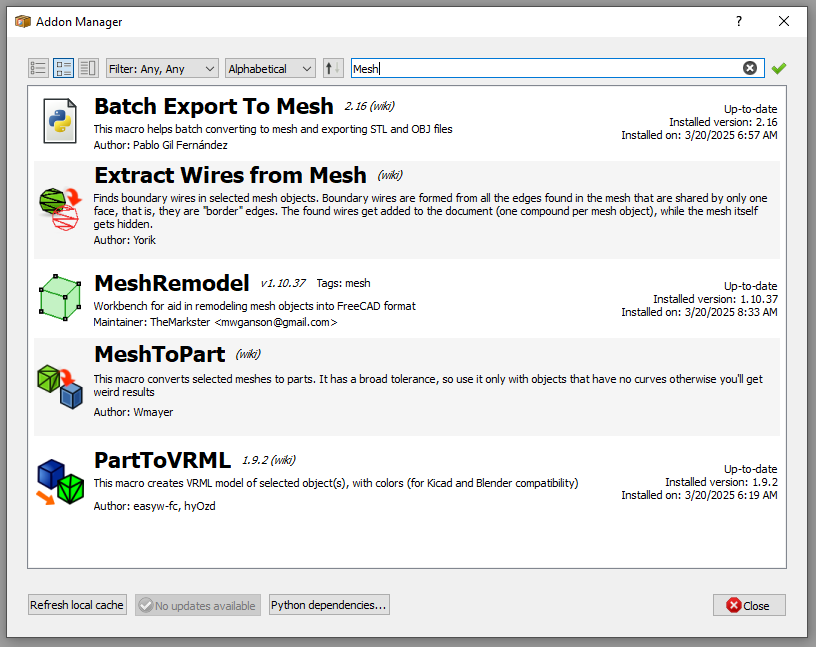
📦 Installation & Basic Workflow-:
-
Installation: The easiest way is via FreeCAD’s AddonManager (
Tools -> AddonManager). After restarting FreeCAD, you’ll find “MeshRemodel” in your workbench list. -
Core Workflow: The standard process involves creating a reference object from your mesh and then using it to trace new geometry:
-
Select your mesh and click “Create Points Object” or “Create WireFrame Object”. This generates an object with selectable points/edges at all the mesh vertices.
-
Use these selectable points to sketch new Mesh Remodel elements (line segments, arcs, circles, etc.).
-
Select the created elements and use the “Create a wire” tool, which can then be upgraded to a face and then a solid.
-
🛠️ Key Tools for Mesh Repair & Editing-:
Beyond remodeling, the workbench includes tools for direct mesh repair:
-
Add or Remove Facet(s): Select 3 points or 2 edges from a points/wireframe object to add a new triangular facet to the mesh. Useful for filling holes or fixing defects.
-
Move Point: Select a mesh and a point from its points object to reposition a vertex, with options to move by coordinates or along its normal vector.
-
Remove Point: Remove a vertex (and all connected facets) from a mesh. You can also add a point by selecting an existing edge and using
Alt+Click. -
Mesh Boundary Wires: A diagnostic tool that creates wires from holes in a mesh, helping to identify defects.
💡 How to Get Started-:
-
Start with a Clear Goal: This workbench is ideal if you have a simple mesh (like a mechanical part) and need to make precise, parametric changes. It is less suited for highly complex, organic meshes (like sculpted figures).
-
Use a Duplicate: Before editing, duplicate your original mesh in the tree view. This preserves the original data in case your modifications don’t go as planned.
-
Repair Before Remodeling: Use the “Analyze and Repair” tool (available in the mesh’s context menu) to fix major issues before starting detailed work.
-
Watch the Orientation: When adding facets, selecting points in a counter-clockwise order tends to produce facets with the correct normal orientation (facing outward).
To give you more targeted advice, what type of mesh object are you working with, and what is your end goal? Knowing whether you need to repair a file for 3D printing or reverse-engineer a part for new designs would help me provide more specific guidance.
Overview of FreeCAD Curve Workbench-:
The Curves Workbench is a specialized, experimental FreeCAD add-on focused on advanced NURBS curves and surfaces. It’s a powerful tool for creating complex, organic shapes that can be challenging with FreeCAD’s standard tools.
Here is a quick overview of its key aspects:
| Aspect | Description |
|---|---|
| Core Purpose | Experimental platform for advanced NURBS (curves and surfaces) modeling. |
| Skill Level | Not suitable for beginners; requires a good knowledge of FreeCAD. |
| Development Status | Experimental; intended for learning and should not be used for critical/serious work. |
| Primary Tools | Tools for creating, editing, and connecting NURBS curves and surfaces. |
📥 Installation Guide
The recommended way to install the Curves Workbench is through FreeCAD’s built-in Addon Manager (Tools → Addon Manager)-1. Once opened, simply search for “Curves” and click the install button. After installation and restarting FreeCAD, you can select the Curves Workbench from the workbench dropdown menu.
For manual installation, you can download the files from its GitHub repository.
🛠️ How to Use the Curves Workbench
The workbench is designed for experimental workflows. It is especially useful for surface modeling, where you create complex 3D shapes by defining and blending between curves.
Here is a general workflow to get you started:
-
Start with Curves: Use tools like
Sketch on SurfaceorInterpolated Curveto draw the profiles of your shape. -
Build Surfaces: Use the curves as boundaries or guides with tools like
Gordon SurfaceorLoftto generate surfaces. -
Convert to Solid: Once you have a closed, “watertight” surface body, you can convert it into a standard FreeCAD solid using the Part Workbench for further operations.
Important Note: Given its experimental nature, save your work frequently. The official documentation can be found on the FreeCAD Wiki, and the main forum for discussion and support is the dedicated Curves Workbench thread on the FreeCAD forum.
I hope this gives you a clear starting point for exploring the Curves Workbench. If you can share what specific kind of shape or project you’re working on, I might be able to offer more tailored guidance on which tools to try first.
Related Posts-:
- Model Involute Gear in FreeCAD
- Let’s understand FreeCAD Part Workbench
- Let’s Explore the FreeCAD user Interface
4. Rendering in FreeCAD-:
- Render Workbench: Integrates external render engines like Pov-Ray, LuxRender, and Blender’s Cycles for high-quality rendering.
- Raytracing Workbench: A simpler alternative for basic rendering.
Use Case: Great for creating realistic visualizations of your designs.
Related Posts-:
- Setup Auto Spacing in FreeCAD Sketcher
- Easily Slice Part with Plane in FreeCAD
- Insert Surface Finish Symbol in FreeCAD Drawing
5. FreeCAD Sheet Metal Workbench-:
- Sheet Metal Workbench: Provides tools for designing sheet metal parts, including unfolding and folding operations.
Use Case: Essential for designing sheet metal enclosures, brackets, and other components.
Related Posts-:
- Measure Area, Volume & Center of Mass with Python Script
- Import Existing FreeCAD Setting on Fresh FreeCAD Installation
- FreeCAD with Python Scripting. Make Tools and Workflows
6. PCB Design in FreeCAD-:
- PCB Workbench: Allows you to design and export printed circuit boards (PCBs).
- KiCad StepUp: Integrates FreeCAD with KiCad for seamless PCB and mechanical design collaboration.
Use Case: Ideal for electronics designers and engineers.
Related Posts-:
- How to Clone and Rotate Body in FreeCAD
- Free Online Tool to View CAD Files
- Easily Rotate Sketch in FreeCAD
7. Architectural Tools
- BIM Workbench: Expands FreeCAD’s architectural capabilities with advanced BIM (Building Information Modeling) tools.
- Dodo (formerly Flamingo): Adds tools for creating pipes, rails, and structural elements.
Use Case: Perfect for architects and civil engineers.
Related Posts-:
- Easily Rotate Sketch in FreeCAD
- FreeCAD vs. Fusion 360: Which is the Best CAD Software
- FreeCAD: Your No-Cost Introduction to 3D Design
8. CAM and CNC
- Path Workbench: FreeCAD’s built-in CAM tool for generating CNC toolpaths.
- CAMotics Integration: Simulate CNC toolpaths directly in FreeCAD.
Use Case: Essential for CNC machining and manufacturing.
Related Posts-:
- Essential FreeCAD Tips for Faster Modeling
- Basic Overview of FreeCAD Sketcher Workbench
- How to install FreeCAD Wiki documentation offline
9. Import/Export Tools
- Import/Export Workbenches: Add support for additional file formats like DAE, SVG, and more.
- OpenSCAD Workbench: Improves compatibility with OpenSCAD files and scripts.
Use Case: Useful for working with diverse file formats and collaborating with other CAD tools.
Related Posts-:
- FCViewer-: Easiest Way to Showcase FreeCAD Project
- Model Involute Gear in FreeCAD
- Let’s understand FreeCAD Part Workbench
10. Utilities
- Manipulator Workbench: Provides advanced tools for moving, rotating, and scaling objects.
- Parts Library: A library of pre-made parts and components to speed up your designs.
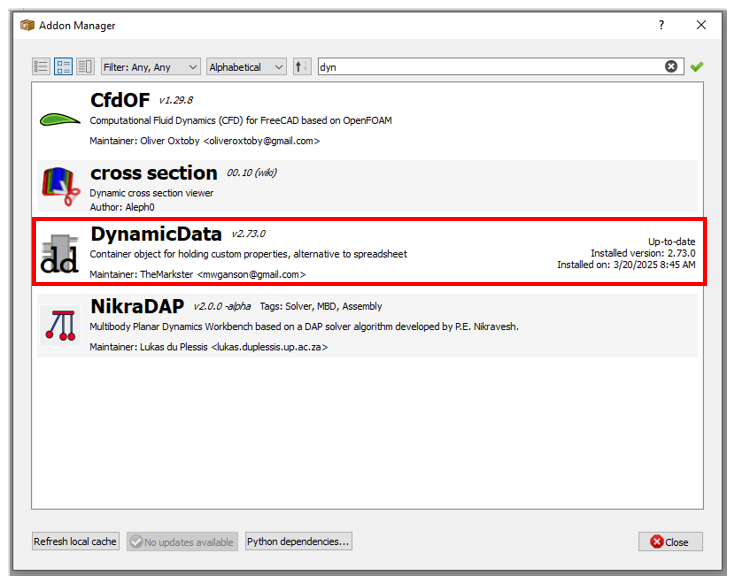
- DynamicData Workbench: Adds spreadsheet-like functionality for managing parameters and data.
Use Case: General productivity enhancements for all types of projects.
Related Posts-:
- How to Clone and Rotate Body in FreeCAD
- Free Online Tool to View CAD Files
- FreeCAD as An Open-Source Parametric 3D Modeling Software
How to Choose the Right Add-ons
- Match Your Workflow: Select add-ons that align with your specific needs (e.g., mechanical design, architecture, 3D printing).
- Check Compatibility: Ensure the add-on is compatible with your version of FreeCAD.
- Read Reviews: Look for user feedback and reviews in the FreeCAD forums or GitHub.
-
Related Posts-:
Tips for Using Add-ons
- Keep Add-ons Updated: Regularly update your add-ons through the Addon Manager to access the latest features and bug fixes.
- Experiment: Try out different add-ons to see which ones best suit your workflow.
- Learn the Tools: Many add-ons come with documentation or tutorials. Take the time to learn how to use them effectively.
Related Posts-:
Conclusion
By leveraging FreeCAD’s add-ons, you can transform it into a more powerful and versatile tool tailored to your specific needs. Whether you’re working on mechanical assemblies, architectural designs, or 3D printing projects, there’s likely an add-on that can help you work faster and more efficiently. Explore the Addon Manager, experiment with new tools, and take your FreeCAD skills to the next level!
“Thank you for reading! If you found this article insightful and valuable, consider sharing it with your friends and followers on social media. Your share can help others discover this content too. Let’s spread knowledge together. Your support is greatly appreciated!”
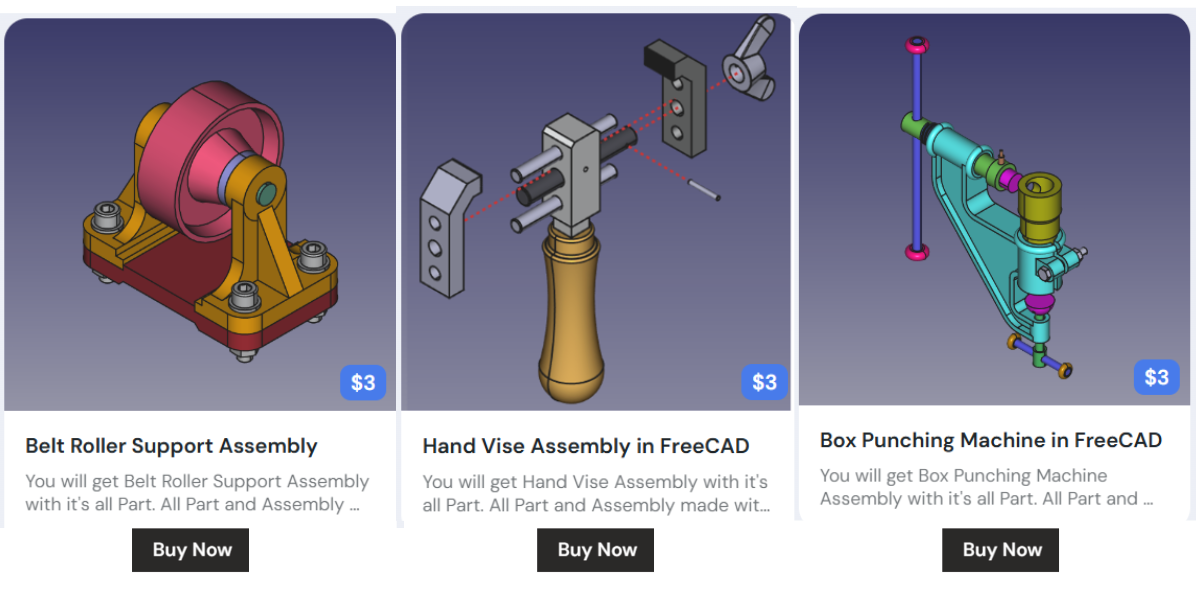
My FreeCAD Projects at Amount of Coffee-: