Hello friends welcome to FreeCAD tutorial in our previous tutorial we have learned how to Create HTML Assembly Hierarchy Structure in FreeCAD. In this tutorial we will learn how to set default workbench in FreeCAD. You can set your preferred default workbench through the Preferences menu. This allows FreeCAD to start with your most frequently used tools ready.
In this tutorial, we will explore the importance of setting a default workbench in FreeCAD and how it can enhance your design workflow. FreeCAD is a powerful open-source 3D modeling software that allows you to create detailed and precise designs for various projects. By setting a default workbench, you can customize your workspace to suit your specific needs and streamline your design process.
Also Read-:
- Importance of Networking for Mechanical Engineers
- 5 Soft Skills Every Successful Mechanical Engineer Needs
- Career Paths You Didn’t Know Existed for Mechanical Engineers
Whether you are a beginner or an experienced user, understanding how to set the default workbench is crucial for seamless design. So, let’s dive in and learn how to master FreeCAD by setting your default workbench!
💡 Understanding Workbenches in FreeCAD-:
FreeCAD uses a “workbench” system to organize tools for specific tasks. Here are some common default workbenches:
| Workbench | Primary Use Case |
|---|---|
| Part Design | Building complex, parametric solid parts; includes Sketcher tools. |
| Sketcher | Creating and editing 2D geometries with precise constraints. |
| Part | Handling basic geometric solids (cubes, cylinders) and Boolean operations. |
| Draft | 2D drafting in 3D space, similar to traditional CAD; handles lines, text, etc. |
FreeCAD uses “lazy loading,” meaning a workbench fully loads only when you first switch to it, which helps keep startup fast.
⚙️ How to Change the Default Workbench-:
Here is the step-by-step process to set your preferred default workbench:
-
Open the Preferences menu: Go to Edit → Preferences from the top menu bar.
-
Navigate to the General settings: In the left panel of the Preferences dialog, select the first tab, which is “General”.
-
Find the Startup section: Look for the setting that controls the behavior when FreeCAD starts.
-
Set your default workbench: Use the “Startup Workbench” dropdown menu. Select your preferred workbench (e.g., Part Design, Draft, Sketcher) from the list.
-
Apply the changes: Click “OK” to save your settings and close the dialog.
The next time you start FreeCAD, it will automatically load your chosen workbench.
Note for Newer Versions: If you are using a recent version like FreeCAD 1.0, you might be presented with a initial configuration screen upon first launch, where you can also set these preferences easily.
Also Read-:
- Things Anyone can do with FreeCAD
- Get Mass Properties, Weight, Volume and Area etc. in FreeCAD
- Mastering FreeCAD: Insider Secrets from an Industry Expert
We have understand the importance of setting a default workbench in FreeCAD, let’s dive into the step-by-step process. First, open FreeCAD and navigate to the ‘Edit’ menu. From there, select ‘Preferences’ to access the preferences dialog box. In the preferences dialog box, you will find a list of workbenches available in FreeCAD.
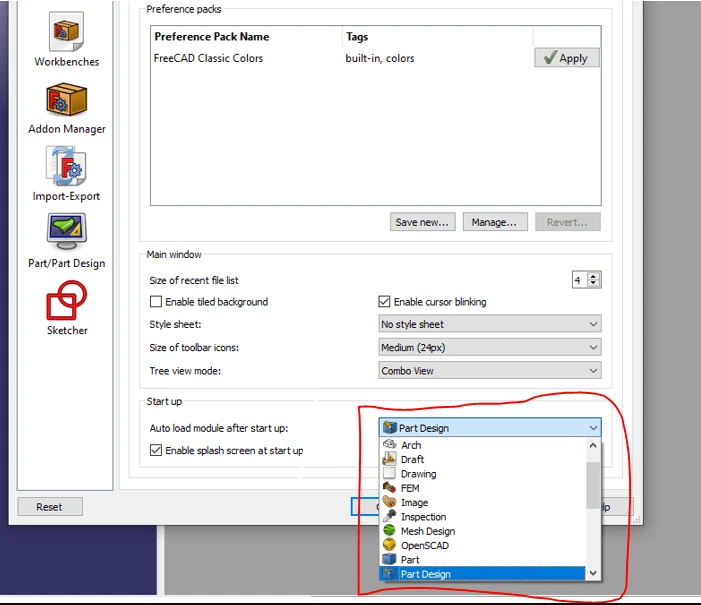
Choose the workbench that you want to set as your default by selecting it from the list. Once you have selected your desired workbench, click on the ‘Set as default’ button. This will ensure that every time you open FreeCAD, your chosen workbench will be automatically loaded. Now, close the preferences dialog box and restart FreeCAD to apply the changes.
Also Read-:
- Master FreeCAD: Top Free Learning Resources to Enhance Your Skills
- Automate FreeCAD with Python Scripting. Make Custom Tools and Workflows
- Exploring the Future of FreeCAD: Innovations and Trends to Watch
Congratulations! You have successfully set your default workbench in FreeCAD. By customizing your workspace to suit your specific needs, you can now streamline your design process and work seamlessly in FreeCAD. Stay tuned for more tips and tricks on mastering FreeCAD!
“Thank you for reading! If you found this article insightful and valuable, consider sharing it with your friends and followers on social media. Your share can help others discover this content too. Let’s spread knowledge together. Your support is greatly appreciated!”